Hello! Today I’ll be sharing the last of the Valentine-type projects I’ve made this year. If you’re looking for the Virtual Valentine’s Day Blog Hop, you’ll want to click here: BLOG HOP post
Being on the InStyle Stamps design team has given me the chance recently to work with some really neat products from Plaid. I received an assortment of Mod Podge glues, two colors of Extreme Glitter, Pop Dots and Mini Pop Dots. Because I was feeling under the weather when I was working on these projects I didn’t get too adventuresome with the products, but hopefully soon I’ll be able to play with them some more.
Before I show you my projects, I want to talk about the Extreme Glitter. I have to admit that for years I’ve stayed as far away from glitter as humanly possible. I really despise the way it gets all over the place and sticks to everything and flakes off your project and you can’t get rid of it. Well, Extreme Glitter is very different. It’s like a cross between a glue and a paint with lots of glitter mixed into it. You simply brush it onto your project with a paint brush and let it dry. When I was just playing with the Extreme Glitter to try it out, I painted a reasonably thick (about 1/16″) coat of it on a scrap piece of cardstock. I gave it about an hour to dry, per the directions on the bottle. Then I took my glittered scrap of cardstock and I rubbed my fingers over the glitter. And I bent the cardstock. And I cut into the painted part. And the glitter seriously DID NOT FLAKE OFF!!! I am SO impressed by that! I thought, “WOW – this gives Operation Write Home cardmakers a way to use glitter safely on their cards!” (Glitter that flakes off onto our heroes’ clothing can be detected by night vision equipment, putting them at higher risk of danger – so glitter is generally a big no-no on OWH cards.) I never thought I’d like glitter, but Extreme Glitter is helping me see it in a whole new light.
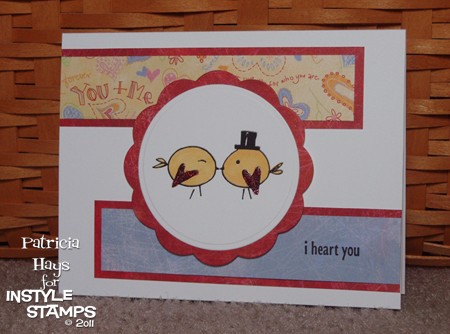
So now, here’s the card I made. Because I plan to donate it to Operation Write Home and their Valentine’s Day deadline is long past, I wanted to keep it a kind of generic “love” theme. The layout for the card is this month’s InStyle Stamps sketch challenge. I used the InStyle Stamps Kissing Birds image. Isn’t it adorable? After I colored the birds with Copic markers, I painted their wings with red Extreme Glitter. (I love that the wings are heart shaped. TOO CUTE!) I added some designer papers from Basic Grey’s Sugar Rush 6″ x 6″ paper pad and a sentiment from Lizzie Anne Designs’ stamp set So Much Love. The circle and scalloped circle were cut with Nestabilities dies and attached to the card with mini Pop Dots. I didn’t have a very good photography day so I don’t know how well you’ll be able to see the glitter in the photo.
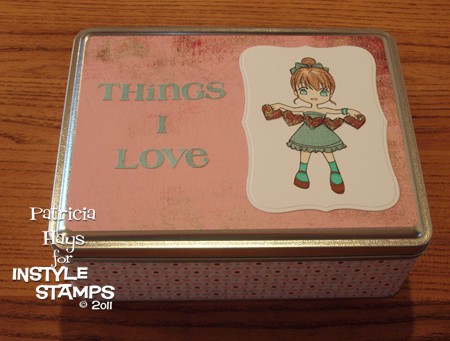
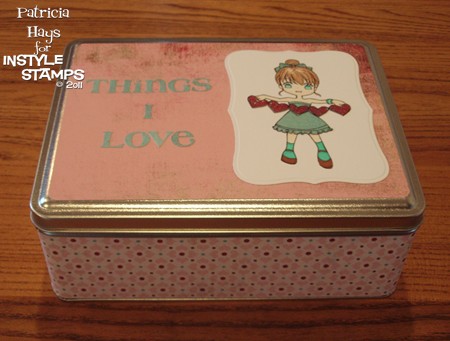
Next… Several months ago, I found an 8″ x 6″ rectangular tin on clearance at Michael’s for only $1.99 (the original price was something like $7.99). I knew I’d be able to decorate it and put it to use some day – and the Plaid products gave me the opportunity to do it. I decided to make it a kind of a treasure box to put special things in, like the birthday cards my sons give me. I chose some papers from Basic Grey’s Blush collection, cut them to the size needed to cover the sides and top of the tin, and used Matte Mod Podge to adhere the papers to the tin. Mom Love, one of InStyle Stamps’ newest digital images, is gracing the top of the tin. She’s on a Nestabilities Labels Eight die cut. I colored much of her with Copic markers, but decided to paper piece her dress and hair bow with another paper from the BG Blush collection. Her string of hearts is also paper pieced from one of the Blush papers. The paper for the hearts is red, and I brushed a thin coat of iridescent Extreme Glitter over the hearts before I cut them out. (And no glitter flaked off when I cut them!) I added the phrase “Things I Love” with the sticker letters from the Blush collection. I considered adding some Prima flowers to the top of the tin because it looks a little plain to me, but my 12-year-old son told me it looked good the way it was. I may just go back and add some anyway. 😉
Here’s another photo that shows the side of the tin better, so you can see how the colors of the papers really do coordinate. (Did I mention that I had a bad photography day when I was working on these projects?)
Thanks for looking at my projects today! If you have any questions about them, feel welcome to ask in a comment!
In the spirit of full disclosure, the images used on today’s projects were provided to me by InStyle Stamps to aid in promoting their products.
One Response to “wrapping up Valentine’s Day”
Sorry, the comment form is closed at this time.








How cute! The tin is my favorite. I think I got the same tin some time ago. I’ve been waiting for inspiration to do something with it. I think my granddaughter would love a “My Favorite Things” tin to keep her treasures in.
Hope you are feeling better.
Blessings Bernie