That’s a place I haven’t been for a while… the beach. I enjoy walking along the shore and letting the waves tickle my feet, but I don’t care for having sand stuck in my swimsuit. Ick. LOL
I have a little confession to make about today’s card. I actually made the focal point several years ago. Like probably 5 years. Really. It’s been sitting around, and I came across it last month and decided I’d finally put it to use on my parents’ anniversary card. I stamped the “congratulations” on it and trimmed it up and matted it and got it on a card base, and ta-da… card done.
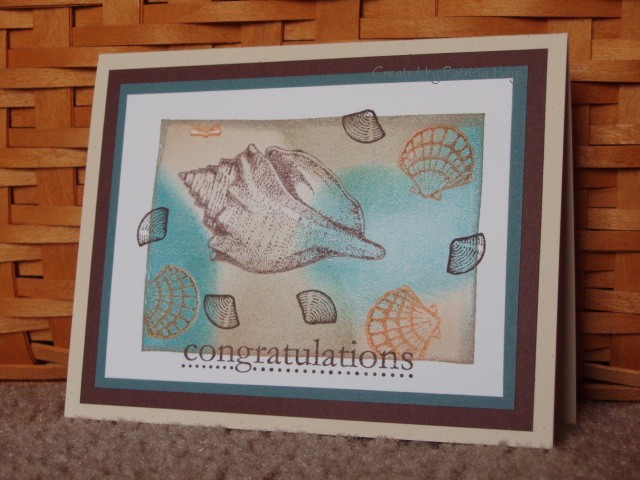
So how did I create it? It’s honestly not quite as difficult as it might look. It’s a technique that I’ve heard described as “palette stamping.” I used a large solid rectangle stamp for the base. I applied pigment ink directly to the stamp in random fashion. (Hint: the “cat’s eye” or petal-shaped ink pads work better for this than a full-sized ink pad.) Next I inked the large and medium shell stamps with dye ink and stamped them directly onto the pigment inked-up rubber. Then I stamped onto the white cardstock. Lastly, I added the little shell images with dye ink.
Now that doesn’t sound too hard, does it? Hey, if I can do it, so can you. 🙂 If you decide to try this version of palette stamping, please add a comment including a link to your creation so I can see it!
Supplies:
Stamps: Stipple Shells (Stampin’ Up!); Large Straight-Edge Rectangle (Hero Arts)
Cardstock: Whisper White, Blue Bayou, Chocolate Chip, Naturals Ivory (Stampin’ Up!)
Ink: Chocolate Chip and Really Rust dye ink (Stampin’ Up!); Dune, Harbor, and I’m not sure of the other color of pigment ink (ColorBox)


Sorry, the comment form is closed at this time.