Hello!  The third Saturday of the month means it’s theme challenge time at 52 {Christmas} Card Throwdown.  This time our hostess, Danielle, would like us to use bling on our cards.

I decided to go blingy with a Christmas tree image, using red and clear rhinestones for the ornaments and adding Stickles to the garland.  The star on top is a silver brad. The layout for the card is an older sketch from the Operation Write Home Stars & Stamps blog.

This also fits into the Hope You Can Cling To “Blingtastic” challenge.

Thanks for stopping by today!  I hope you’ll join in and play along with us at 52{C}CT and/or at Splitcoaststampers!

Supplies:
Digital Image: Rhubarb Trims the Tree (Sweet ‘n Sassy Stamps)
Cardstock: Kraft (Stampin’ Up); Pure Luxury White (Gina K. Designs); designer papers from Arctic Frost 6″ x 6″ paper pad (Basic Grey)
Ink: printer ink
Other: markers (Copic); star brad (The Paper Studio); red rhinestones (KaiserCraft); clear rhinestones (Bazzill); Frosted Lace Stickles (Ranger)


Hello!  Welcome to my stop on the Operation Write Home World Card Making Day Blog Hop! I’m excited to be joining over 100 other card makers in celebrating the fun and joy of creating cards by sharing cards made for the purpose of sending to our military members stationed overseas.  Most of these cards are blank inside so that our service members may write to their family and friends back at home.  Others contain notes from the cardmakers to thank these men and women for serving our country.

This year, the blog hop is showcasing a theme of thanks.  The card makers were also asked to use one of the many OWH Stars and Stamps sketches to guide them in designing their cards.  I’ve chosen sketch #183 and decided to make an AnyHero card using it.  So later on, I’ll use this card to write a note to a service member stating my appreciation for their dedication to our country.  I did add an extra layer to the sketch so that the star shaped brads wouldn’t poke through the card front to the inside of the card.  After seeing this star design embossing folder used for so many cards in previous OWH blog hops, I finally decided a few months ago that I should get one, too.  The white background panel and the large white star are made from a textured cardstock with a subtle linen weave appearance that’s often difficult for me to capture on film.

Thanks for stopping by today!  I hope you enjoy the hop and come back to visit my blog again, and that you’ll join me in creating cards for this wonderful cause!  Click on the OWH badge at the top of this post to find out where you should hop next.

Supplies:
Stamp: Thank You for your Sacrifice and Service (Unity)
Cardstock: Real Red, Brilliant Blue, Whisper White, Whisper White textured (Stampin’ Up)
Ink: Real Red (SU)
Other: mini star brads (The Paper Studio); Stars dies (Sweet ‘n Sassy Stamps); Stars embossing folder (ProvoCraft)

The eighth Labor Day Virtual Card Making Party challenge presented by Operation Write Home was to create a bee themed card.   Because I tend to think of bees as more of a spring thing than fall, it took me all week to figure out what I wanted to do for this challenge.  Today I remembered I had this bee tree image already stamped with the background sponged in. I’d started to use it on a different project a while ago but then shifted gears on that one and put this image away in a folder.  It looked like it would work with this week’s OWH Stars & Stamps sketch if I turned the sketch on its side.   So after some coloring and tweaking, I combined the two challenge ideas into one card.

I tried to keep the colors from looking too spring-y.  The “ribbon” banners are scraps of the same color cardstock I used to mat the image panel, but I’ve stamped them with a denim-textured stamp in the same color ink.  The blue sentiment panel is popped up with a few cardstock shims to accommodate the thickness of the image panel.  (I guess I could have planned it out to butt them up against each other, but too late now.)

So there’s another any occasion card for my Operation Write Home stash.  Yay!  Thanks for stopping by today.

Supplies:
Stamps: Lucky You (Lizzie Anne Designs); Just Jeans (Stampin’ Up)
Cardstock: Certainly Celery, Bashful Blue, Soft Suede (SU); Pure Luxury White (Gina K. Designs)
Ink: Bashful Blue, Soft Suede, Certainly Celery (SU); Onyx Black (VersaFine)
Other: markers (Copic); sponges

Hello!  Today’s card combines this week’s OWH Stars & Stamps sketch challenge with the sixth OWH Labor Day Virtual Card Making Party challenge.  For the VCMP challenge, we were asked to make a card for a child, but choose elements for the card from a tic-tac-toe diagram.  I went straight down the middle of the diagram to create a card that involved both stamping and coloring, a punny sentiment, and a creature with four legs.   I hope some boy will enjoy receiving this card from his mom or dad!

I still have a few more VCMP challenges to complete.  I’m still hoping I can get them all done before the challenge deadline on Sunday.  Wish me luck!  😉  Thanks for stopping by today.

Supplies:
Stamps: Mini Critters, Cute Critters (Sweet ‘n Sassy Stamps)
Cardstock: Pure Luxury White (Gina K. Designs); designer papers from Phoebe collection (Basic Grey)
Ink: Tuxedo Black (Memento)
Other: standard circle and big scalloped circle Nestabilities dies (Spellbinders); markers (Copic)

I’ve combined the fourth OWH Labor Day Virtual Card Making Party challenge with this week’s Dynamic Duos color challenge.  The color challenge is to pair Perfect Plum with a color of the participant’s choice.  I picked Certainly Celery.  The VCMP challenge is to create a love-themed card using OWH Stars & Stamps sketch #29.  This is a great sketch for clean and simple styled cards, but it holds potential for being dressed up with embellishments if you’d wish.  I kept it pretty CAS, but I rounded a few corners to keep it from looking too boxy.  The blossoms were stamped onto scrap cardstock, cut out, and then adhered to the focal panel.  The bottom left blossom is popped up a bit with a cardstock shim underneath it, to add just a little dimension to the card.  I had one blossom left over so I used it to perk up the inside of the card.  I wanted to add some sort of visual interest to the green panel, so I stamped the leafy image on it, after stamping the ink off once on scrap paper. Even though the sentiment is from a set called “Masculine Messages”, I think this particular one works well on cards for either men or women.

Thanks for stopping by today!  I still have some more VCMP challenges to work on, so off I go…

Supplies:
Stamps: Best Blossoms (Stampin’ Up); Masculine Messages (Gina K. Designs)
Cardstock: Perfect Plum, Certainly Celery, Very Vanilla (SU)
Ink: Perfect Plum, Certainly Celery
Other: corner rounder punch (EK Success)

Good morning!  It’s the first Monday of the month, which means it’s time for a new challenge at Cards in Envy!  This time we’re being challenged to make manly, masculine cards to be sent to the men in our lives.  Remember, though, that the main requirement for Cards in Envy challenges is that your card must fit in an A2 sized envelope and not have any lumpy, bumpy embellishments that could push it over the first class postage rate.

I’ve used the challenge to make another card for my Operation Write Home stash.  Occasionally I need a gentle reminder that some of our heroes stationed overseas may be women wanting to send cards home to their husbands or fiancés, or that sometimes the men want to send cards home to their dads, brothers, or any other important man in their lives.  So this challenge was a good nudge for me to create something suitable for a hero to send home to a man.

My husband has always loved trains, so I thought the vintage train image was a good start for my masculine card.  I looked through the OWH sketch library for a layout that would work with this image.  Sketch #46 fit the bill, and when I consulted my checklist of OWH sketches, I hadn’t used it before, so hooray, I can check it off now!  The designer paper has a kind of rustic look to it that I thought fit well with the theme.  I tried several different shades of blue and liked this one the best.  I decided to emboss the image with copper embossing powder.  I wanted to use the copper brads as an embellishment.  As far as brads go, these are pretty flat.  I originally considered making a row of them on the blue, above the image panel.  But I decided to add a sentiment to the card, and used the brads in the corners instead.  I also embossed the sentiment – which probably would have turned out better if it had been a larger font,  but I suppose it isn’t too bad.  Unfortunately, I had a hard time getting it to be legible in a photo.


Be sure to check out the Cards in Envy site for all the challenge details and to see what the rest of the design team has created!  Then create a manly card of your own and share it with us using the linky tool on the site.  You have until Sunday, September 15 to play along with us!

Supplies:
Stamps: All Aboard, Three Little Words (Stampin’ Up)
Cardstock: Naturals Ivory, Midnight Muse, Spring Showers designer series paper (SU)
Ink: Champagne (Encore)
Other: copper brads, dimensionals (SU); copper embossing powder (Ranger)

Hello! Operation Write Home is hosting a Virtual Card Making Party to celebrate the Labor Day weekend!  It’s full of fun crafty card making challenges.  Links to all the challenges can be found on the OWH Stars and Stamps blog.

For VCMP challenge #1, we’ve been presented with a sketch to follow to create a winter or holiday card.  I used some of my scraps of Christmasy designer paper, inked the edges of them, and mounted them onto textured cardstock to give the card some subtle extra visual interest.  The sketch seemed a little top heavy to me, so I turned it on its side.  For some reason having it “left heavy” doesn’t bother me.  OK, I’m weird.  LOL

Here’s the sketch:

Now I need to get working on the remaining challenges! 🙂 Thanks for stopping by today.

Supplies:
Stamps:  More Merry Messages (Stampin’ Up)
Cardstock: Wild Wasabi, Whisper White textured (SU); scraps from Nordic Holiday 6″ x 6″ paper pad (Basic Grey)
Ink: Wild Wasabi, Cherry Cobbler (SU)
Other: 1″ square punch (Creative Memories); sponge

Hello!  It’s the fourth Saturday of the month, which brings us to embellishment/technique week at 52 {Christmas} Card Throwdown.  Our hostess Sarah is challenging everyone to try using canvas as an embellishment on their Christmasy creations.

The first several things I tried with my canvas didn’t work out well, so finally I decided to simply die cut it.  In the learning process with that, I discovered that the canvas cuts more cleanly if you run it through a Xyron machine first.  (Upon more thought, it’s possible that using a temporary adhesive to attach the canvas to a piece of printer/copy paper would work, too.)  I’ve used OWH Stars & Stamps sketch #186 for the layout, but substituted the die cut canvas dove for the rectangle in the sketch.  My original plan was to stitch around the edges of the bird, but handstitching through the canvas and cardstock and designer paper proved to be too tedious with not so nice looking results.  I’m not quite sure how I got stuck on this color combination with the blues, but I think it turned out all right.

Go check out the 52{C}CT blog for more inspiration from the rest of the design team, and then share your own creations using canvas with us!  You have until 1:00 p.m. eastern time Friday, August 30 to link your artwork.  We’d love to see what you can do!  Thanks for stopping by today.

Supplies:
Stamps: Warmest Wishes (Lizzie Anne Designs)
Cardstock: Naturals Ivory, Night of Navy (Stampin’ Up); Soft Marble – Parlor Blue designer paper (ProvoCraft)
Ink: Night of Navy (SU)
Other: Holiday Windows Movers & Shapers dies (SU); canvas (7 Gypsies); Victoria embossing folder (PC)

Hello!  Today I’m excited to announce that I was recently invited to join the Design Team at the Cards in Envy challenge blog!  The main objective of Cards in Envy is “making cards that fit in envelopes” – in other words, creating A2 sized cards with no lumpy, bumpy embellishments, that can be mailed without additional postage.  Since this fits in so well with the cards I make for Operation Write Home, it was pretty much a no-brainer for me to accept the invitation!

So the challenge being introduced today is my first challenge as part of the CIE Design Team.  The challenges are presented on the first and third Mondays of each month, so there is plenty of time to join in!  This time, the challenge theme is “For the Birds”, which means the cards have to have at least one bird on them.

I’ve had this mailbox image stamped and colored and sitting on my desk for probably about a year.  Yes, really.  I’m fairly certain it started out as an idea for a card to fulfill some crafty challenge.  It was on a die-cut oval.  I figured since I haven’t used it in that form for so long, maybe I needed to do something else with it.  So I looked through the OWH Stars and Stamps sketches for a sketch I hadn’t yet used that had a space on it large enough to accommodate the mailbox.  I started with Sketch #1, and scored with Sketch #30.  I turned the sketch on its side.  I drew the sidewalk (no comments from the peanut gallery about my drawing skillz, please, LOL!) and used a light shade of blue to sponge in some sky.  The bird and envelope were stamped on scrap cardstock, colored, and fussy cut.  Then I fussy cut the mailbox from the oval background and attached it to its new background.  I added the envelope, and then I used dimensional adhesive to attach the bird.  Although it doesn’t really show in the photo, the red strip in the background is textured cardstock.  The sentiment is one that I think works really well for OWH cards.

So now it’s your turn!  Check out the Cards in Envy site for all the challenge details, and share your birdie creation(s) with us by Sunday, September 1.  We’d love to have you play along with us!

Supplies:
Stamps: You’ve Got Mail (Lawn Fawn)
Cardstock: Brilliant Blue, Basic Black, Real Red Core’dinations (Stampin’ Up); Pure Luxury White (Gina K. Designs)
Ink: Tuxedo Black (Memento); Soft Sky (SU)
Other: markers (Copic); dimensionals (SU); sponge

Hello!  I hope you’re having a great weekend so far.

This week at 52 {Christmas} Card Throwdown we are celebrating the “holly-days” with a holly themed challenge!  The design team has made some great cards with various holly images. You can go to the 52{C}CT site to see what they’ve created, and if you love what you see, feel welcome to comment on their work – I know they’d really appreciate it!

For my card, I used designer paper with a holly pattern as well as a stamped holly image.  This designer paper is old stuff, LOL.  I bought it back in the early 2000s when I was a Longaberger consultant because the paper matches one of the fabrics that the company used for some of their basket liners.  The colors in the designer paper helped me choose some of my retired Stampin’ Up cardstock colors for the rest of the card.  I used a hole punch to cut out the berries in the stamped image so that the cranberry colored paper would show through and give the berries a more realistic color.   The layout for this card is OWH Stars & Stamps sketch #185.

All right – now it’s your turn to get creating!  We’d love it if you share your holly-riffic cards on our challenge blog.  You can link your card until 1:00 p.m. Eastern time Friday, August 23.  Thanks for stopping by today!

Supplies:
Stamps: Happiest of Holidays (Stampin’ Up); Seasonal Sayings (Gina K. Designs)
Cardstock: Mellow Moss, Cranberry Crisp (SU); American Holly designer paper (The Longaberger Company)
Ink: Garden Green (SU)
Other: Cranberry Crisp stitched ribbon (SU)

Hello!  It’s the fourth Saturday of the month, which means it’s time for an embellishment or a technique challenge at 52 {Christmas} Card Throwdown.  This week our hostess, Jacqueline, is challenging us to use sequins and/or pearls to embellish our Christmas cards.

I’ve chosen to use pearls on my card – mainly because I don’t own any sequins.  I decided to use them as the ornaments on the tree in this digital image.  The pastel colors of the pearls dictated my color choices for the card.  The layout is a fairly recent OWH Stars & Stamps sketch that I hadn’t yet used.  I originally planned to turn the sketch on its side to make this a portrait-oriented card, with the sentiment banner across the bottom, below the image panel.  However, as I opened one of my green markers to color the image, it splattered green ink on the cardstock, right above Cocoa Mouse’s head.  I tried using colorless blender to “erase” it, but I wasn’t completely successful at that.  I didn’t want to take the time to print another image and color it, especially since I’d already colored Cocoa and the garland.  So I ended up turning the card back to a landscape layout, and angled the sentiment banner to cover up the ink spot.  I guess that’s making the best of a bummer situation.  It’s hard to tell in the photo, but the yellow cardstock is textured, to give the card a little more visual interest in real life.

I hope you’ll check out the challenge details at the 52{C}CT site and play along with us this week!  Be sure to visit the rest of the design team members’ blogs for some more inspiration.  Thanks for stopping by today!

Supplies:
Digital Image: Cocoa’s Christmas Tree (Sweet ‘n Sassy Stamps)
Sentiment Stamp: More Merry Messages (Stampin’ Up)
Cardstock: Blushing Bride, Barely Banana textured, Certainly Celery (SU); Pure Luxury White (Gina K. Designs)
Ink: printer ink; Tuxedo Black (Memento)
Other: half pearls (KaiserCraft and Basic Grey); markers (Copic)

When I saw that this week’s colors for the Dynamic Duos challenge were Blushing Bride and Soft Suede, I was super happy because I really like the combination of pink and brown.  I toyed with different ideas of what to do with them, and finally had a chance to sit down last night and start working with them.

I decided to go quick and easy, and I am low on love-themed cards for the box I’m preparing for Operation Write Home, so those factors decided my card theme and design.  I picked sketch #29 from the OWH Stars & Stamps blog for my layout.  It’s an older one, but I hadn’t used it before, so it feels good to check another one off the list.  I stamped the long vertical panel with a subtle design in the same color ink and added a ribbon to give it more visual interest.

I have to admit that I didn’t care for the Blushing Bride color when it was first introduced.  But it’s grown on me in the last year or so.  I like that it isn’t “little girlie pink” and doesn’t look overly feminine.

Thanks for stopping by today!  I hope you’ve been having a good week.

All supplies for this card are from Stampin’ Up.
Stamps: Branch Out, Small Sayings, Sanded, Three Little Words
Cardstock: Blushing Bride, Soft Suede, Very Vanilla
Ink: Blushing Bride, Soft Suede
Other: Blushing Bride ribbon, dimensionals

Hello! I’m helping Operation Write Home observe Memorial Day this weekend by participating in their blog hop. We’re remembering the brave men and women who have given their all for our country and its freedom by sharing cards made for the purpose of sending to our military members stationed overseas so that they may write home to their loved ones. OWH also sends “AnyHero Mail”, which are cards of thanks and encouragement to our heroes working far from home.

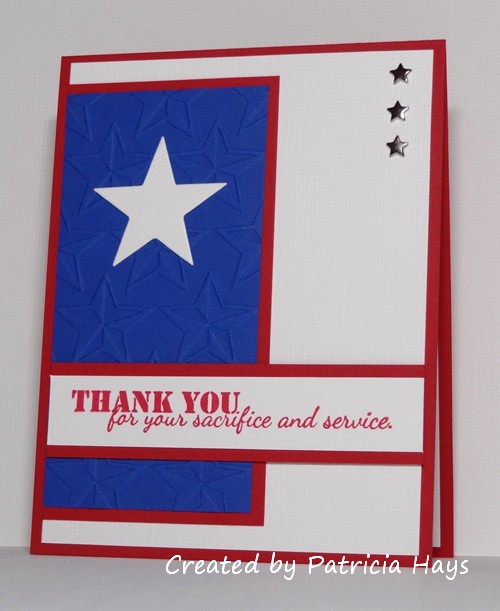
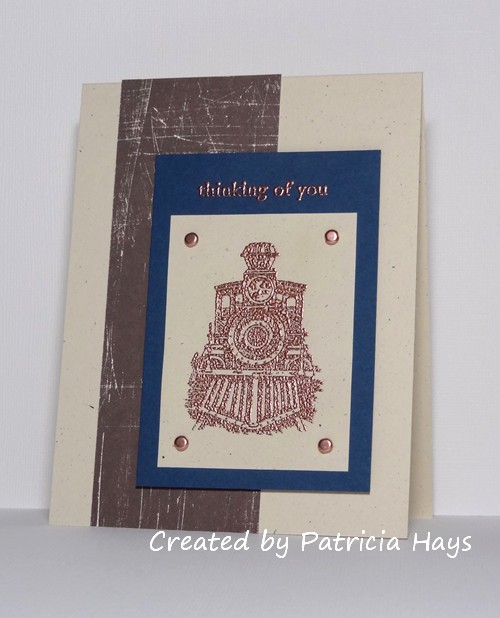
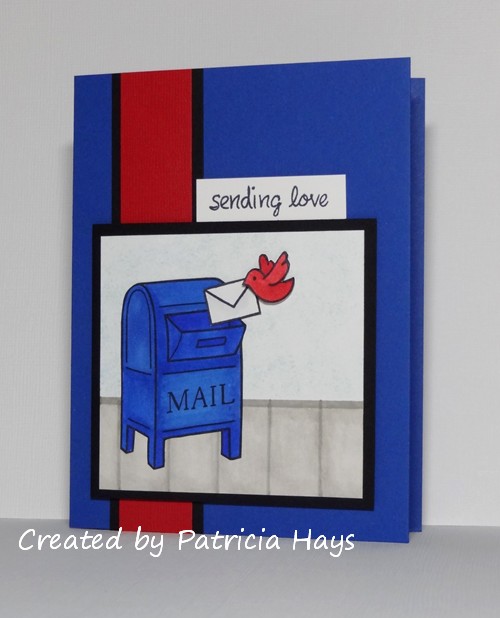
I’ve created two cards for this blog hop. First off is an AnyHero card, which turned out to be a lesson in perspective for me. I ran through a lot of problems while creating it. I wanted to use a stamp from one of my stamp sets for the main image, but it turned out to be defective, so I had to use the digital version of the image instead. (Thank goodness for alternatives!) That actually was a good thing because then I was able to resize the image a bit larger than the stamp version – and when having to color around those tiny stars, it helps to have it larger! Then the red and blue panels didn’t seem to measure up correctly to the card base, so I had to do a lot of fine trimming with them. It was all pretty frustrating – but then I thought to myself, I really don’t have much reason to complain because I’m working on this in the comfort of my own home, without worry of being under attack from enemy forces, while a lot of our heroes are risking their lives in the heat of the desert far from their families and homes. The things that were annoying me are nothing compared to what our heroes go through on a daily basis. Pretty sobering perspective. Anyway, here’s the card. I used OWH Stars & Stamps sketch #40 for it.  Later I’ll write a note in it to one of our heroes, to thank him/her for the service he/she is giving our country.


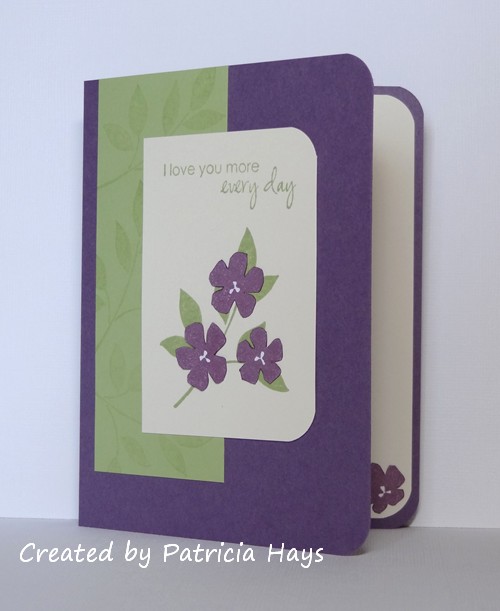
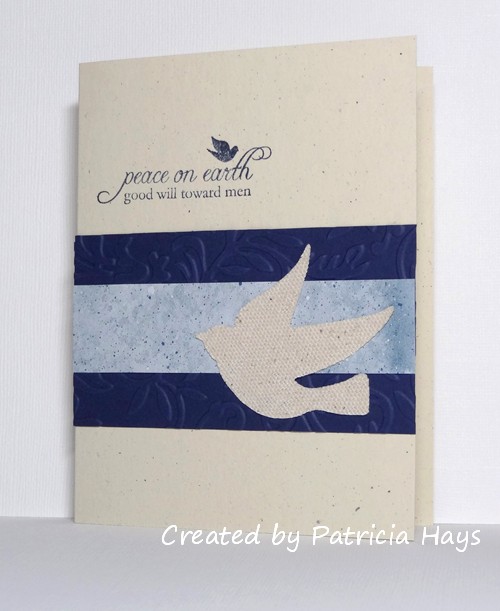
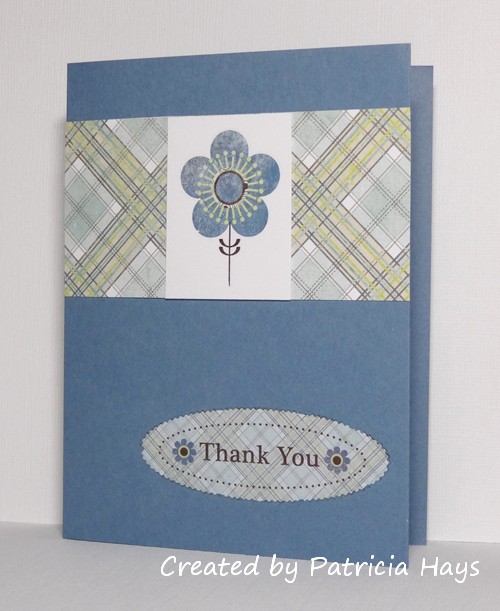
Next is a thank you card that one of our heroes can send home.  I have a checklist of all the OWH Stars & Stamps sketches, and I’ve been trying to make at least one card for every sketch.  I dug way back in the archives to sketch #5 for this card.  It’s a very unusual card for me because there is no stamping on it!  The flower and the sentiment oval are both rub ons that coordinate with one of my Basic Grey paper pads.  Before I send the card to my OWH shipper, I’ll be sure to add a white liner sheet inside of it, since the cardstock base is kind of dark.  This will help make whatever is written inside be more easily read.


So, that’s it for today!  To see the rest of the blog hop participants’ creations, click on the OWH banner at the top of this post.  Thanks for stopping by!  All comments are read and appreciated.  Enjoy the rest of your weekend, and be sure to take some time to remember our heroes who have died in service in order to make our country and world a better place.

Supplies for the AnyHero card:
Digital Image: Patriotic Cocoa (Sweet ‘n Sassy Stamps)
Sentiment Stamp: Patriotic Cocoa clear stamp set (SNSS)
Background Stamp: Background Basics (Stampin’ Up)
Cardstock: Brilliant Blue, Real Red (SU); Pure Luxury White (Gina K. Designs)
Ink: printer ink; Tuxedo Black (Memento); Brilliant Blue (SU)
Other: markers (Copic)

Supplies for the Thank You card:
Cardstock: Buckaroo Blue, Whisper White (Stampin’ Up); designer paper from Marjolaine 6″ x 6″ paper pad (Basic Grey)
Other: Marjolaine rub ons (Basic Grey)

Hello!  It’s the second Saturday of the month, which means it’s time for another color challenge at 52 {Christmas} Card Throwdown.  It’s a monochromatic scheme of navy, light blue, and white, which is a good combination for wintry cards!  It’s all right to use black for a sentiment or for an outline image, but otherwise the colors used in your card need to stick to the color scheme.

It took me a while to figure out what to create.  My in-laws have been visiting this week and I’ve been spending time with them, so I needed to keep my card pretty quick and simple.  I decided to go with this older layout from the OWH Stars & Stamps sketches archive.  I chose this bear image because it would be quick to color and easy to put with the challenge color scheme.  (I did take a little liberty with the colors to make the bear’s nose dark gray; I felt black would be a bit too harsh.)  The navy vertical panel is embossed with snowflakes.

So, now it’s time for you to check out the other design team members’ creations, and then make a card with these colors to link to the challenge site!  We’d love to see what you can do!  Thanks for stopping by today.

Supplies:
Stamps: Cozy Friends (Sweet ‘n Sassy Stamps)
Cardstock: Bashful Blue, Night of Navy (Stampin’ Up); Pure Luxury White (Gina K. Designs)
Ink: Night of Navy (SU); Tuxedo Black (Memento)
Other: markers (Copic); Snowflakes embossing folder (Sizzix)

Sweet 'n Sassy Digi Challenge #100

Comments Off on Sweet ‘n Sassy Digi Challenge #100
Apr 122013

Hello!  It’s time for the 100th weekly challenge at Sweet ‘n Sassy Digi Challenge! This week’s challenge, unfortunately, comes with some bittersweet news.  Because the clear stamps and dies part of the Sweet ‘n Sassy Stamps business is booming, Korin (the owner) is needing to let some things in her life go – and sadly, this challenge blog is one of those things.  This week’s challenge will be the last Sweet ‘n Sassy Digi Challenge.  All the current Sweet ‘n Sassy digital images will continue to be sold in the Sweet ‘n Sassy Stamps online store, but there will be no more regularly scheduled new digi releases.

However, since 100 challenges is still a major milestone, we are going out with a celebratory bang!  One participant in this week’s challenge will receive 3 Sweet ‘n Sassy digital images of his/her choice.  Participants who use a SNSS digital image in their work may link their project twice, for an additional chance to win.  Please see the SNSDC site for all the details on how you can win this fun prize.

This week’s challenge is Pick Your Favorite!  Take a look through the previous Sweet ‘n Sassy Digi Challenges and choose one of them to inspire your project.  When you write your challenge description, please share which challenge you used.  Remember to use a digital image as the main focal point of your creation!

I had a really hard time settling on one previous challenge, and I didn’t have time to make multiple cards.  So I’ve combined three of my favorite challenges into this one card.  Those of you who have been reading my blog for some time know how much I enjoy making cards for Operation Write Home – for our country’s military men and women who are stationed overseas to be able to write to their loved ones at home.  A lot of those heroes have children waiting at home for them.  So I felt compelled to use SNSDC93, a card for a child.  I just love all the cute Sweet ‘n Sassy critters, so that tied SNSDC99 into today’s card.  I also like stitching on my cards (even though I don’t do it very often) so that incorporated SNSDC77.  I was also aiming for SNSDC58, to make a clean and simple card, but I used one of the OWH Stars & Stamps bonus sketches for the layout and it turned out more accurately described as clean and layered.

Thank you to everyone who has supported the Sweet ‘n Sassy Digi Challenge blog through their participation in the challenges.  I know I’ll miss being part of the SNSDC design team.

Supplies:
Digital Image: Bunny Love (Sweet ‘n Sassy Stamps)
Cardstock: Pure Luxury White (Gina K. Designs); designer papers from Sugar Rush 6″ x 6″ paper pad (Basic Grey)
Ink: printer ink
Other: markers (Copic); standard and big scalloped circle Nestabilities dies (Spellbinders); embroidery floss (DMC)

© 2019 Suffusion theme by Sayontan Sinha