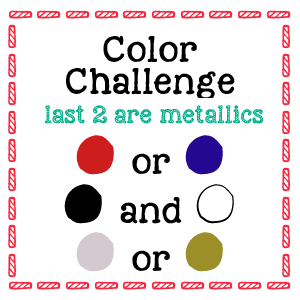
Hello again!  It’s color challenge week at 52 {Christmas} Card Throwdown, and we have a very traditional combination for you to work with: red, green, and your choice of either metallic silver or metallic gold.

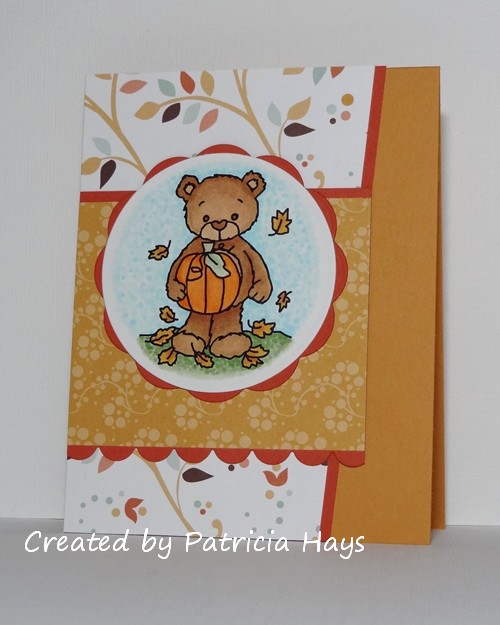
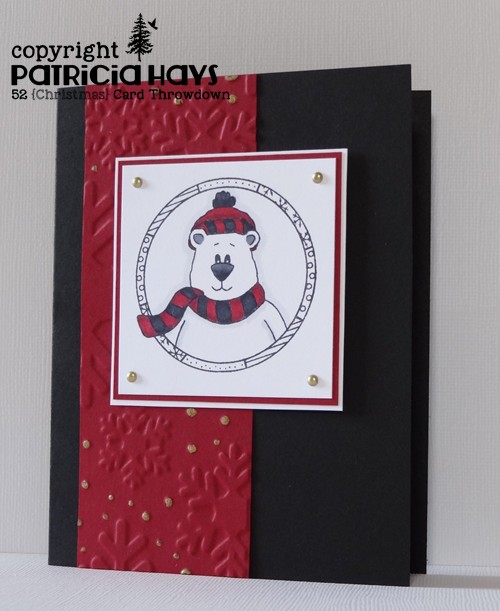
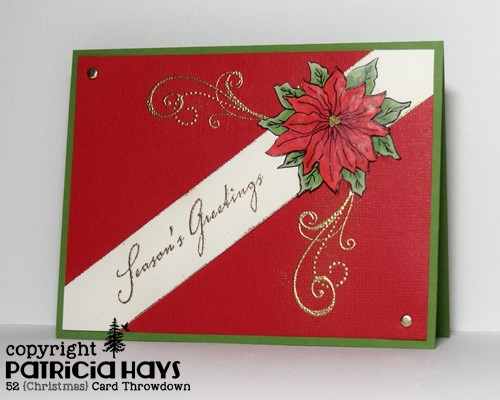
My card ended up as a rather traditional styled card.  I opted for a classic poinsettia image for my red and green.  I used the paper tole technique on the poinsettia to give it some dimension.  Unfortunately, it also gave the poinsettia a bit of glare that I couldn’t avoid when I was photographing the card.  The large red panel is textured cardstock, which gives the card some subtle visual interest.  I did go a little out of the ordinary with the sentiment panel, attaching it diagonally across the card.  The sentiment panel is edged with a bit of gold embossing to coordinate with the gold embossed sentiment and flourishes.  A couple of gold brads finish off the card.

52CCT 11-08-2014

Now it’s your turn to show us what you can make with these colors!  If you need more inspiration first, go visit the 52{C}CT site and see what the rest of the design team has created.  Be sure to link your card at the 52{C}CT site by 1:00 p.m. Eastern time on Friday, November 14.  We look forward to having you join us!

Supplies:
Stamps: Season of Joy, Scenic Season (Stampin’ Up)
Digital Image: Poinsettia (Sweet ‘n Sassy Stamps)
Cardstock: Gumball Green, Real Red textured (SU); Pure Luxury Ivory (Gina K. Designs)
Ink: gold (ColorBox); printer ink
Other: gold embossing powder (Ranger); gold brads (Making Memories)

Greetings!  It’s time for another color challenge at CAS – Colours and SketchesLizy is our challenge hostess this month, and she’s chosen a very classic color combo.

When I saw metallic gold on the challenge rubric, I got a little excited.  I knew I wanted to combine a few things I’ve tried over the last few months.  After I stamped the border of red polka dots, the vanilla panel got spritzed with some gold pearl mist spray.  Unfortunately, the shimmer from it doesn’t show very well in the photo.  I used textured cardstock to die cut the heart.  I gave it some swipes with my VersaMark ink pad and heat embossed it with gold powder to give the edges some shiny definition.  Using dimensional adhesive to attach the heart gives it even more separation from the background.

CASCAS99

Be sure to check out what the rest of the CC&S Design Team has made!  Then create your own clean and simple styled card with these colors and link it to the CC&S site by 1:00 p.m. Wednesday, November 12.  We’d love to see what you make!

Supplies:
Stamps: Grunge Borders (Sweet ‘n Sassy Stamps); Masculine Messages (Gina K. Designs)
Cardstock: Real Red, Very Vanilla, Very Vanilla Textured (Stampin’ Up)
Ink: Real Red (SU); VersaMark (Tsukineko)
Other: Heirloom Gold Perfect Pearls Mist, gold embossing powder (Ranger); Heart #2 Sizzlits die (Sizzix); dimensionals (SU)

Here’s a quick card I made for the current Freshly Made Sketches challenge just before the challenge deadline.  I chose the chicken image and sentiment so that the card fits into the Chicks Stick Together challenge for Splitcoaststampers.com’s Hope You Can Cling To.  The chicken is a digital image that I purchased online, but I created the sentiment myself using Microsoft Word. I doodled some dots around the edges of both circles (although it’s hard to see the pale yellow dots around the chicken).  The patterned papers are some old, old scrapbooking papers from my stash.  The red paper has a faint splatter print, and the yellow paper has a subtle plaid print.

OLYMPUS DIGITAL CAMERA

Thanks for stopping by today!  🙂

Supplies:
Digital Image: Hey Chicky (Sweet ‘n Sassy Stamps)
Cardstock: So Saffron (Stampin’ Up); Pure Luxury White (Gina K. Designs); patterned papers from Cottage Papers Collection (Keeping Memories Alive)
Ink: printer ink
Other: markers (Copic); standard circle Nestabilities dies (Spellbinders)

Cards in Envy - Pumpkin Patch

Comments Off on Cards in Envy – Pumpkin Patch
Nov 032014

Hi there! It’s Cards in Envy challenge introduction day! For the next two weeks we have a theme challenge of Pumpkin Patch.  Show us your A2 sized cards featuring at least one pumpkin.  Remember to keep your cards flat enough to fit in an envelope and be mailed at the first class postage rate.

Since Halloween has passed, I didn’t want to use a jack-o-lantern image.  I chose this cute Rhubarb the teddy bear digital image for my card and colored it with Copic markers.  I’ve combined a couple other challenges along with the Pumpkin Patch challenge.  The layout is this past week’s sketch challenge at Splitcoaststampers.com, and the teddy bear lets the card qualify for the Warm Fuzzies Hope You Can Cling To challenge.

CIE 11-3-2014

If you need additional inspiration, please go check out the Cards in Envy site and see what the rest of the design team has made.  What kind of pumpkin card will you create?  Share your work with us on the Cards in Envy site by 7:00 p.m. Eastern time Sunday, November 16.  We’d love to have you play along with us!

Supplies:
Digital Image: Rhubarb’s Autumn Day (Sweet ‘n Sassy Stamps)
Cardstock: More Mustard, Dusty Durango, Autumn Vine designer paper (Stampin’ Up); Pure Luxury White (Gina K. Designs)
Ink: printer ink
Other: markers (Copic); standard circle and big scalloped circle Nestabilities dies (Spellbinders); small scalloped border die (Papertrey Ink)

Get inked!

Comments Off on Get inked!
Oct 212014

Happy Tuesday!  All during the month of October, Splitcoaststampers is sponsoring Hope You Can Cling To to benefit the MD Anderson Cancer Center. A different challenge is being presented each day of the month.  I’m excited today because it’s my day to host the challenge!

My challenge is called “Get Inked”, and it’s dedicated to my mom and to other cancer patients who have received, or who are currently receiving, radiation treatment.  In preparation for radiation treatments, frequently the affected area of the patient’s body is tattooed with dots so that the technicians can line up the machines accurately each day of treatment.  So my challenge is to use a liquid ink to create dots or spots somewhere on your artwork.  You can drip or spray the ink, and your inked piece can be used as part of your main focal point or as a background.  The choices are up to you!

The card I’m sharing today features some inked leaves.  The leaves are from a digital stamp set.  I printed them and then watercolored them with ink from stamp pad refills.  Once the leaves were dry, I dipped a paintbrush into a small pool of ink, held the brush over the leaves, and tapped the brush so the ink would splatter randomly onto the leaves.  I repeated this process with several different colors of ink.  For the background of the card, I scored double lines across the cardstock and used them to frame the leaves.

HYCCT1421 birthday blog

I hope you’ll join in the Hope You Can Cling To challenges at Splitcoaststampers.com and help bring cheer to the cancer patients at MD Anderson!  Thanks for stopping by today!

Supplies:
Digital Images: Autumn Leaves (Sweet ‘n Sassy Stamps)
Sentiment Stamp: Birthday Whimsy (Stampin’ Up)
Cardstock: Cajun Craze, Naturals White (SU); Solar White (Neenah)
Ink: printer ink, Tuxedo Black (Memento)
Other: Daffodil Delight, More Mustard, Wild Wasabi, and Cajun Craze ink refills (SU); score board (Martha Stewart)

Hello! This week is color challenge week at 52 {Christmas} Card Throwdown.  We have a bright, non-traditional color palette this time.  The challenge graphic shows five colors and you should choose at least three of them for your creation.  Using a few neutral colors for stamping outline images and sentiments is also allowed.

I’ve used four of the five colors for my card: the bright blue, the turquoise, and the two shades of pink.  The vivid colors suggested bright Christmas lights to me, so I pulled out my stamp set with Christmas lights and used that theme for my card.  The lights also fit into the “Shine On” challenge for Splitcoaststampers.com’s Hope You Can Cling To challenges.  It’s nice using up some of this retired pink cardstock, LOL!  The card seemed kind of bland when I laid it all out just before adhering everything, so I decided to fussy cut adjacent to the line of the lights strand.  Cutting the white cardstock was easy, but I’ll admit that trimming the black to give a consistent look with the straight edges of the panel was more difficult.  I’ve put a couple of small twinkly rhinestones in place of the dots over the letter “i”s in the sentiment, and added some larger rhinestones in the corner to balance out the look.

52CCT 10-11-2014

And now it’s your turn to show us what you can create!  We’d love it if you joined our challenge this week.  You have until 1:00 pm Eastern time Friday, October 17 to link your card at the 52{C}CT site. Thanks for stopping by today!

Supplies:
Stamps: Holiday Baubles (Sweet ‘n Sassy Stamps); Magic of Christmas (Technique Tuesday)
Cardstock: Pixie Pink, Basic Black, Whisper White (Stampin’ Up)
Ink: Tuxedo Black (Memento); Pink Passion, Tempting Turquoise, Pixie Pink, Brilliant Blue (SU)
Other: rhinestones (SU)

Today’s card is a relatively quick one that I made up to include in the shipment I sent to Operation Write Home yesterday.  It’s based off of this week’s sketch at CAS(E) this Sketch!; I’ve used the mirror image of the sketch because it worked better with the direction the cherub is facing.  I’ve used clouds in place of the chevrons on the sketch.  The little angel on his own cloud takes the place of the arrow element.  I used some scrap cardstock as shims underneath him, to raise him off off the background clouds a bit.  In the photo, you can see some of the shadow created by that.  The sentiment pretty well speaks for itself.  It’s a good one for OWH cards!

CTS95

Thanks for stopping by to take a closer look at my card!  🙂  All comments are read and greatly appreciated.

Supplies:
Stamps: Love From Above, In My Heart (Mama Elephant)
Cardstock: Bashful Blue (Stampin’ Up); Pure Luxury White (Gina K. Designs)
Ink: Tuxedo Black (Memento)
Other: markers (Copic); Clouds & Raindrops dies (Sweet ‘n Sassy Stamps)

Cards in Envy - Autumn Leaves

Comments Off on Cards in Envy – Autumn Leaves
Oct 062014

Good morning!  It’s the first Monday of October, so that means it’s time for a new challenge at Cards in Envy.  This fortnight we’re encouraging our challenge participants to get in a seasonal mood and make cards showcasing autumn leaves.  Cards for this challenge should be A2 sized and be less than 1/4″ thick, since the “in Envy” part of our challenge name means that the cards should be able to be mailed in an envelope at the regular first-class postage rate.

When I look closely at leaves, especially in the fall, I don’t see just one solid color.  They tend to be multiple colors – sometimes various shades of red or yellow or orange, and sometimes one dominant color speckled with other colors.  Similar to snowflakes, there seems to be no two exactly alike.  So I’ve created some speckled leaves for my card for this challenge.  The leaf images I used are from a digital stamp set, and I printed several off in slightly different sizes onto white cardstock.  I gave them a base color of yellow by watercoloring them.  After they were dry, I dipped my paintbrush into a couple different colors of ink and flicked the brush to splatter the ink randomly on the leaves.  I scored a couple of horizontal lines on the card base to “frame” the leaves, but the scored lines don’t show very well in the photo.

CIE 10-6-2014

What kind of leaves will you use on your card?  If you need additional inspiration, please go check out the Cards in Envy site and see what the rest of the design team has made.  Then create a card following our challenge guidelines and share it with us using the linky tool on the Cards in Envy site.  The challenge will close at 7:00 p.m. Eastern time Sunday, October 19. We’d love to have you play along with us!

Supplies:
Digital Image: Autumn Leaves (Sweet ‘n Sassy Stamps)
Stamp: Year Round Sentiments (Hero Arts)
Cardstock: Dusty Durango (Stampin’ Up); Pure Luxury White (Gina K. Designs)
Ink: printer ink; Tuxedo Black (Memento)
Other: Daffodil Delight and Pumpkin Pie ink refills (SU)

WCMD2014

Hello! Welcome to my stop on the Operation Write Home World Card Making Day Blog Hop! Today we’re celebrating the fun and joy of making cards by sharing cards made for the purpose of sending to our military members stationed overseas, so that they may write to their family and friends back at home. Be sure to check this page of the Operation Write Home website to find out more about exactly what types/themes of cards are needed.

For today’s blog hop, we’ve been asked to create cards with a love theme.  That’s a theme that can be used in so many ways – as a card from a husband to his wife back home, or from a woman to her parents, or from a mom or dad to their child(ren).  Really, pretty much any family situation is perfect for a love-themed card!

I’ve opted to create a card that can be sent home to a child.  I think that at some point, every child wishes she or he could be a super hero.  It seems only natural that a super hero would give and receive super hugs!  I’ve also tied this card into today’s Splitcoaststampers.com Hope You Can Cling To challenge.

OWH blog hop 10-4-2014

Thanks for stopping by today!  I hope you enjoy the hop and come back to visit my blog again, and that you’ll join me in creating cards for both of these wonderful causes!  Click on the OWH badge at the top of this post to find out where you should hop next.

Supplies used for this card:
Stamps: Super Duo (Mama Elephant for Simon Says Stamp)
Cardstock: Daffodil Delight, Real Red, Soft Sky (Stampin’ Up); Pure Luxury White (Gina K. Designs)
Ink: Tuxedo Black (Memento)
Other: markers (Copic); Crusader Kids die (Mama Elephant for Simon Says Stamp); Clouds & Raindrops Dies (Sweet ‘n Sassy Stamps); embroidery floss (DMC); mini star brad (The Paper Studio)

Hello!  At 52 {Christmas} Card Throwdown we’re closing out the month with stash challenge week, where we invite our challenge participants to use particular items from their crafting stash to create a Christmas or wintry card.  This time it’s a double item find – diamonds and pearls.  OK, so we honestly don’t expect anyone to actually use real diamonds, but rhinestones make a perfect substitute for them.

I’ve decided to use one of my favorite Christmas themed digital images, of Rhubarb the teddy bear decorating his Christmas tree.  I’ve used rhinestones and pearls to cover up the ornament shapes in the image.  I also added a star-shaped brad to the top of the tree.  The sentiment is a Lawn Fawn stamp.

52CCT 09-27-2014

The layout for this card is Splitcoaststampers.com sketch challenge #507.  However, I can’t share the card on the site there yet because it just might be giving you a sneak peek of one of the SCS Hope You Can Cling To challenges coming up in the month of October!  😉

Now it’s your turn to show us how you can make your card sparkle and shimmer!  If you’d like some more inspiration, be sure to see what the rest of the 52{C}CT design team has made.  Then share your card with us, linking it at the 52{C}CT site by 1:00 p.m. Eastern time Friday, October 3.  We’d love to have you join us!

Supplies:
Digital Image: Rhubarb Trims the Tree (Sweet ‘n Sassy Stamps)
Sentiment Stamp: Pa-Rum-Pa-Pum-Pum (Lawn Fawn)
Cardstock: Blushing Bride, Basic Black (Stampin’ Up); Pure Luxury White (Gina K. Designs); designer papers from Nordic Holiday 6″ x 6″ paper pad (Basic Grey)
Ink: Tuxedo Black (Memento); printer ink
Other: markers (Copic); rhinestones (SU); Pearl and Blush half pearls (KaiserCraft); star brad (The Paper Studio)

Hello! This week is color challenge week at 52 {Christmas} Card Throwdown. Our September challenge hostess, Asha, has chosen a fun color palette that each participant can choose to customize.  Black and white are required colors, plus either blue or red, and either silver or gold.

I’ve chosen to go with the red scheme in a cherry shade.  I added some gold pen to the dotted part of the embossing and embellished the corners of the focal panel with gold mini brads.  There’s really not much else to say about this card so I’ll just go ahead and share it:

52CCT 09-13-2014

Which colors will you play with?  Create your Christmas or winter themed card and share it with us at the 52{C}CT site by 1:00 p.m. Eastern time Friday, September 19.  We’re looking forward to seeing what you make!

Supplies:
Stamps: Cozy Friends (Sweet ‘n Sassy Stamps)
Cardstock: Basic Black, Cherry Cobbler (Stampin’ Up); Solar White (Neenah)
Ink: Tuxedo Black (Memento)
Other: markers (Copic); mini brads (Recollections); gold paint pen (Zig); Snowflakes embossing folder (Sizzix)

Hello there!  It’s time for another color challenge this week at 52 {Christmas} Card ThrowdownGill, our hostess for the month of August, is asking us to create our Christmas or wintry cards using only four colors – white, cream, silver and gold – and all four of those colors must be used.

I tossed a few different ideas around in my head for this week’s card.  I finally settled on a rather clean and simple design using the current sketch from Seize the Sketch.  For the star, I die cut cream textured cardstock, dabbed it onto my Versamark ink pad, sprinkled gold embossing powder on it, and heated up the embossing powder.  I repeated the inking and embossing several times until I achieved the grungy effect I wanted.  I used a stamp from one of my newest stamp sets for the background behind the star, and heat embossed that with silver embossing powder.  The sentiment is also heat embossed in silver.  I used dimensionals to adhere the star, attached the panel to a mat of gold foil cardstock, and then put it on a cream colored base.  The grunge look is something I haven’t really tried, but I’m pleased with the final result.

52CCT 08-09-2014

Now it’s your turn to show us what you can make with these colors!  If you need more inspiration first, go visit the 52{C}CT site and see what the rest of the design team has created.  Be sure to link your card at the 52{C}CT site by 1:00 p.m. Eastern time on Friday, August 15.  We look forward to having you join us!

Supplies:
Stamps: Work of Art, More Merry Messages (Stampin’ Up)
Cardstock: Pure Luxury Ivory, Pure Luxury White (Gina K. Designs); gold foil, Very Vanilla textured (SU)
Ink: silver (Colorbox); VersaMark
Other: Stars die (Sweet ‘n Sassy Stamps); dimensionals (SU); gold and silver embossing powders (Ranger)

Hello!  It’s the first Monday of the month, which means it’s time for a new challenge at Cards in Envy!  For the next two weeks we have a nice summery theme for our challenge – “Toes in the Sand”.  The design team has come up with some great cards showing off a beach theme – go check them all out at the challenge site!

I don’t own many beach related stamps, but I have had this digital image for a while now.  I’ve always felt somewhat intimidated by coloring it.  I don’t mind coloring things, but scenes are a different ball game.  But I decided it was time to give it a go with a sunset look.  Because it’s a digital image, I was able to flip it and use the mirror image of it.  I felt the mirror image worked better so the sentiment banner wouldn’t cover up the umbrella.  The layout for this card is from OWH Stars & Stamps sketch challenge #227. The strip of designer paper is a scrap of some I bought at a craft store many years ago, and I’m no longer sure of the manufacturer.

Now it’s time for you to create your own beach themed card and share it with us at the Cards in Envy site!  Remember that cards for our challenges must be A2 sized (4.25″ x 5.5″) with no lumpy, bumpy embellishments that would prevent them from being mailed with a regular first-class postage stamp.  We can’t wait to see what you make!

Supplies:
Digital Images: Ocean Paradise, Masculine Birthday Greetings (Sweet ‘n Sassy Stamps)
Cardstock: Naturals Ivory, Basic Black (Stampin’ Up); Pure Luxury White (Gina K. Designs); designer paper (source unknown, but possibly from ProvoCraft)
Ink: printer ink
Other: markers (Copic)

Hello!  I’m back from a short crafting hiatus taken while finishing renovating a bathroom, celebrating my older son’s high school graduation, and having my husband’s family visit for several days.  And it’s just in time for a new challenge at Cards in Envy!  For the next few weeks, we’re using the theme of Fun in the Sun.

I went pretty clean and simple with my card.  I printed off a digital image, colored it, and used a funky shaped die to cut it out.  I repeated the colors of the image in the card base and added a ribbon to join the two colors together.  The image panel is adhered with thin dimensional adhesive.


Go check out what the rest of the Cards in Envy Design Team has made, and then make your own A2 sized card depicting your idea of fun in the sun.  Be sure not to use any lumpy, bumpy embellishments that would prevent your card from fitting into an envelope and being mailed at the standard postage rate.  Share it with us at the Cards in Envy site by 7:00 p.m. Eastern time Sunday, July 6.  We’d love to see what you create!

Supplies:
Digital Image: Cocoa’s Beach Ball (Sweet ‘n Sassy Stamps)
Stamp: So Happy For You (Stampin’ Up)
Cardstock: Pure Luxury White (Gina K. Designs); Soft Sky, Creamy Caramel (SU)
Ink: printer ink
Other: markers (Copic); Real Red grosgrain ribbon (SU); Wonky Rectangle Nestabilities die (Spellbinders); foam squares (Scotch)

Cards in Envy - Feeling Buggy

Comments Off on Cards in Envy – Feeling Buggy
Jun 022014

Hi there!  It’s time for a new challenge at Cards in Envy.  Our theme this time is “Feeling Buggy” – which means the cards for this challenge should all show some sort of insect.

I still had the materials for last Thursday’s card out when I started on my card for this challenge.  I decided I’d go ahead and use the same color scheme, and to make things easy, I figured I’d keep the general layout too.  So this card follows the current CAS – Colours and Sketches challenge, too.  To fit the Cards in Envy theme, I used this little ladybug image.  The bug’s antennae don’t lend themselves well to fussy cutting, so I felt it was best to keep the bug on a panel, but mat it to add an extra splash of color.  I ended up with this easy-peasy quick card, which will be another addition to the box I’m filling for Operation Write Home:

So how will you be “feeling buggy”?  Create your A2 sized card, remembering to keep it less than 1/4″ thick, and share it with us at Cards in Envy by 7:00 p.m. Eastern time Sunday, June 15.  We’d love to see your artwork!

Supplies:
Stamps: Somebuggy Loves You (Sweet ‘n Sassy Stamps)
Cardstock: Coastal Cabana, Baked Brown Sugar, Real Red (Stampin’ Up); Pure Luxury White (Gina K. Designs)
Ink: Tuxedo Black (Memento)
Other: markers (Copic); standard circle and big scalloped circle Nestabilities dies (Spellbinders); Woodgrain embossing folder (SU)

© 2019 Suffusion theme by Sayontan Sinha